Im a Newly Divorced Empty Nester. What Do I Cook Just for Myself?
There are millions of recipes on the internet, but you still don’t know what to cook. Tell us about it! Dear Bon Appétit is an advice column where we answer your culinary conundrums with hand-picked recipes and well-seasoned advice. Submit a question here.
I have been making meals for my family of five for 20+ years. My last child is preparing to leave the house and I am finalizing my divorce. In a few months I will be responsible for feeding only one person—me. I am looking for ways to stay in the kitchen to prepare food for myself. (I take lunch to work five times a week and eat dinner at home six nights a week.) I love veggie-centric, high-flavor dishes. Thoughts, recommendations, resources? —New Era
Let’s start with a round of applause. By my math, that means you’ve cooked over 6,000 dinners for your family. And that’s just dinners! I bow down to you. I hope your children (cough, cough, if they’re reading this) do too.
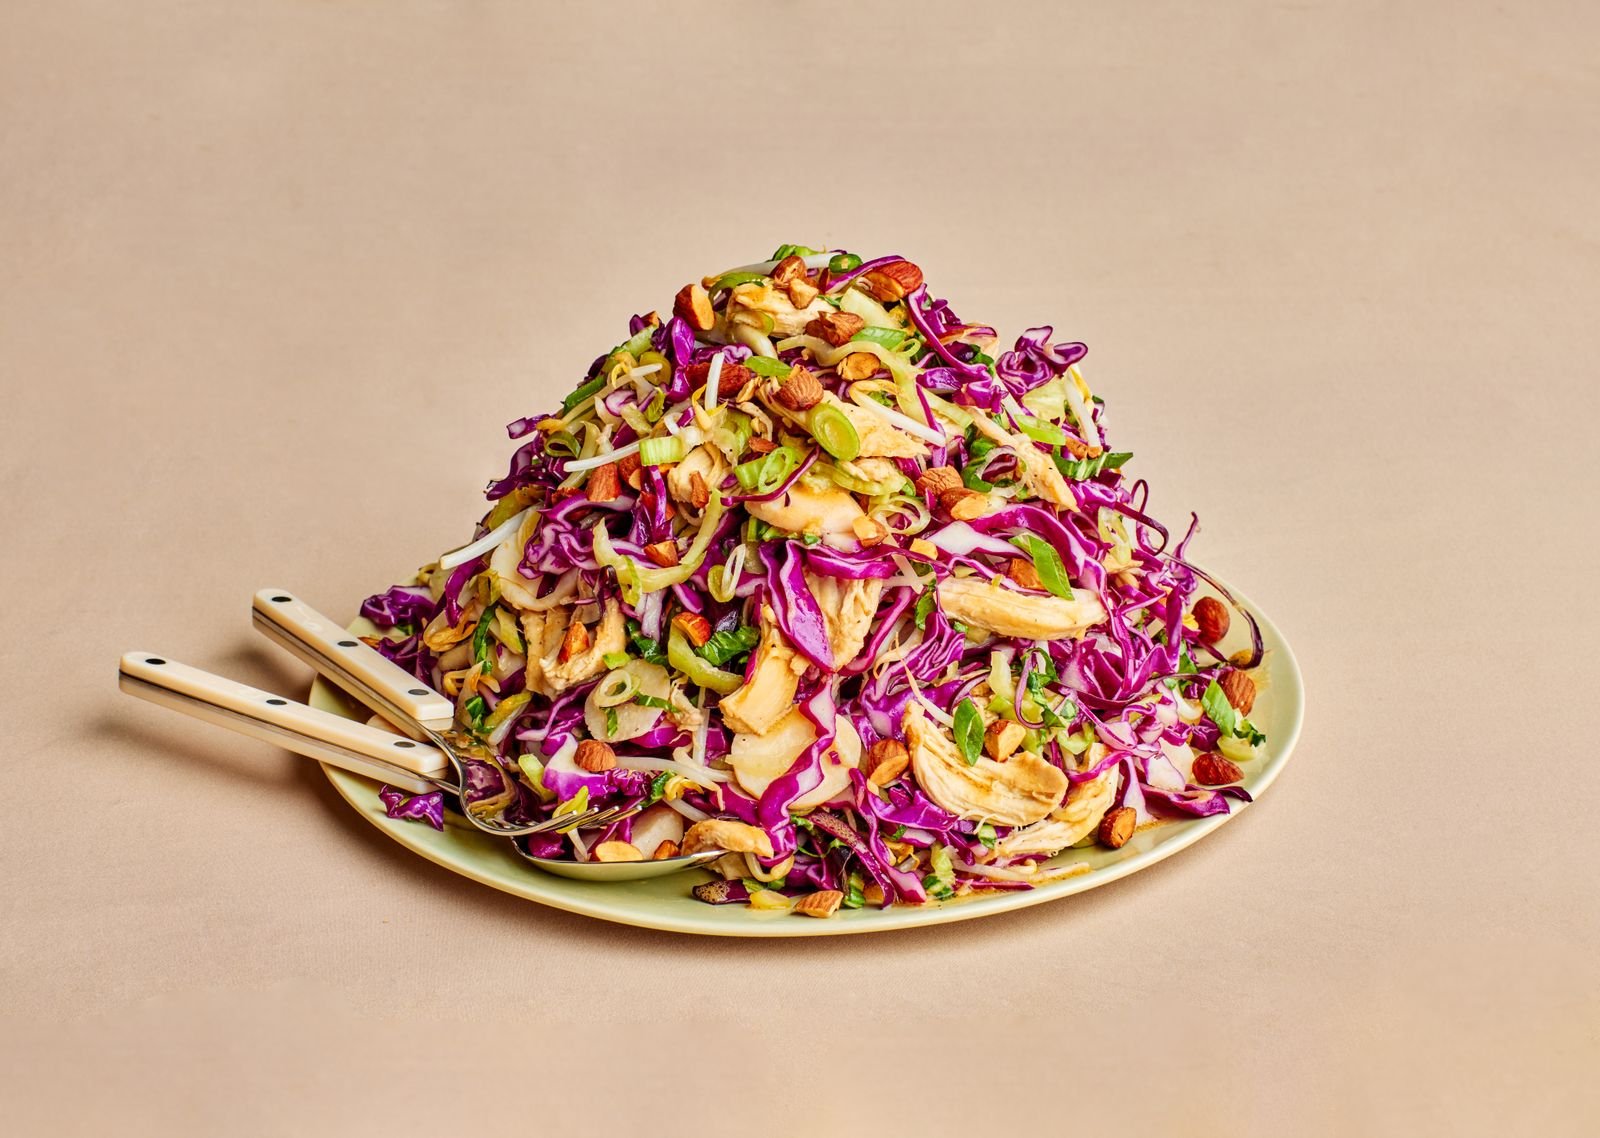
Let’s tackle lunch first: Since you are beyond proficient at feeding a group, I’d channel that skill toward this tough-to-fit-in meal. Cook a pot of soup—even double the recipe if you have freezer space—and freeze it in pints. (These wide-mouth mason jars are my go-to. Freezer-friendly, microwave-safe, and sturdy enough to survive a ride on NJ Transit. Which is saying something!) I’ve made this lemony red lentil soup many times; you’d never guess it was languishing in my freezer for half a year. I throw in some leafy greens toward the end of cooking (usually pre-washed, pre-cut kale) and skip the garlic topping altogether (it’s fun, but not happening in the office kitchenette). If it’s hot where you are this time of year, a cold soup is more perishable but worth it. Whip up a blender full of this gazpacho at the start of the week and pop it in the fridge. Tote the soup in one container and some chopped veggies in another for sprinkling on top al desko. A treat! And if you tire of soup, make a sturdy salad. Bob’s Chicken and Cabbage Salad has many fans at BA HQ (you could halve it to cover a week’s worth of lunches), as does my colleague Hana Asbrink’s aptly titled Happy Fridge Salad.
Photograph by Isa Zapata, food styling by Emilie Fosnocht, prop styling by Sean Dooley
For dinner, your description made me chuckle because…did I write this? Veggie-centric, check! High-flavor, check! Our food director Chris Morocco is spectacular at this exact category. In fact, he has a recipe called Big-Flavor Broccoli. Red onion, anchovies, garlic, parm. Serve with some crusty bread and your pick of hummus (store-bought really is fine), Greek yogurt or labneh, or a big blob of burrata, and you have a lovely little supper. (Leftovers can easily morph into another meal. Toss with pasta, spoon over polenta, etc.) Chris’s kale pesto is another banger. He pairs it with whole-wheat spaghetti (love), but it has range. It would be great on soba or udon. Or ditch the noodle and spoon it over roasted vegetables or even scrambled eggs. You can make the full batch and chip away at it for days, or freeze the surplus in portions for weeks to come. And Chris’s salad ramen is a fun, riffable template to zhuzh up a single serving of instant noodles.
Each spring Spencer Huey brings thousands of homegrown heirloom tomatoes to a parking lot in Berkeley, California, for a one-day community sale. “I grow 50 varieties of tomatoes and 2,500 plants,” says Huey, a cook at Chez Panisse and creator of the Tomato Club substack. “It’s a little crazy.”
Fortunately, there are plenty of enthusiasts who share his devotion. As temperatures rise, heirloom tomatoes—open-pollinated varieties grown from seeds that have been passed down for generations—headline backyard plots, farmstands, Michelin-starred kitchens, and beyond. For devotees, the juicy flavors, rainbow colors, and irregular shapes and sizes of heirloom tomatoes are worlds away from the blandly homogenous red armies sold in supermarkets.
But what are heirloom tomatoes, exactly? And how are they different from the ones your nearest grocery chain stocks all year long? Here’s everything you need to know.
In this article
What are heirloom tomatoes?
Heirloom tomatoes are flavorful varieties grown from seeds that farmers have saved and handed down from farmer to farmer, usually for at least 50 years. “They’re created by a specific community or culture because they like the traits, the color, or the way the tomato tastes,” Huey says.
To be clear, the tomatoes themselves aren’t antiques. They’re called heirlooms because their seeds predate the grim march of industrial hybridization. In the 20th century, many farmers began crossing tomato varieties to create hybrids that looked uniform, resisted disease, and could withstand long-haul shipping to retailers miles away. Taste was less of a priority.
Meanwhile, “heirloom tomatoes are grown for flavor,” Huey says. Their generations-old seeds are open-pollinated—fertilized by insects, wind, and the like—rather than being manipulated by breeders.
The term heirloom isn’t regulated, though. A savvy marketer can use that word to sell any fruit or vegetable, regardless of whether its seeds were around during the Nixon administration.
Heirloom tomatoes versus ‘regular’ tomatoes
Most tomatoes you’ll find in the produce sections of grocery chains are hybrids. They tend to be uniformly red and evenly sized, with thick skins designed to withstand transit.
Heirloom tomatoes are more diverse. Some are the size of cherries or golf balls, while others are charmingly bulgy and weigh up to three pounds. Depending on the variety, they may taste intensely sweet, tangy, smoky, savory, or almost citrusy. Colors include scarlet, orange, green, yellow, blue, deep purple, or a combination; insiders describe the stripey ones as tomatoes with “shoulders.” In any case, expect heirloom tomatoes to have thin skins and juicy, flavorful interiors.
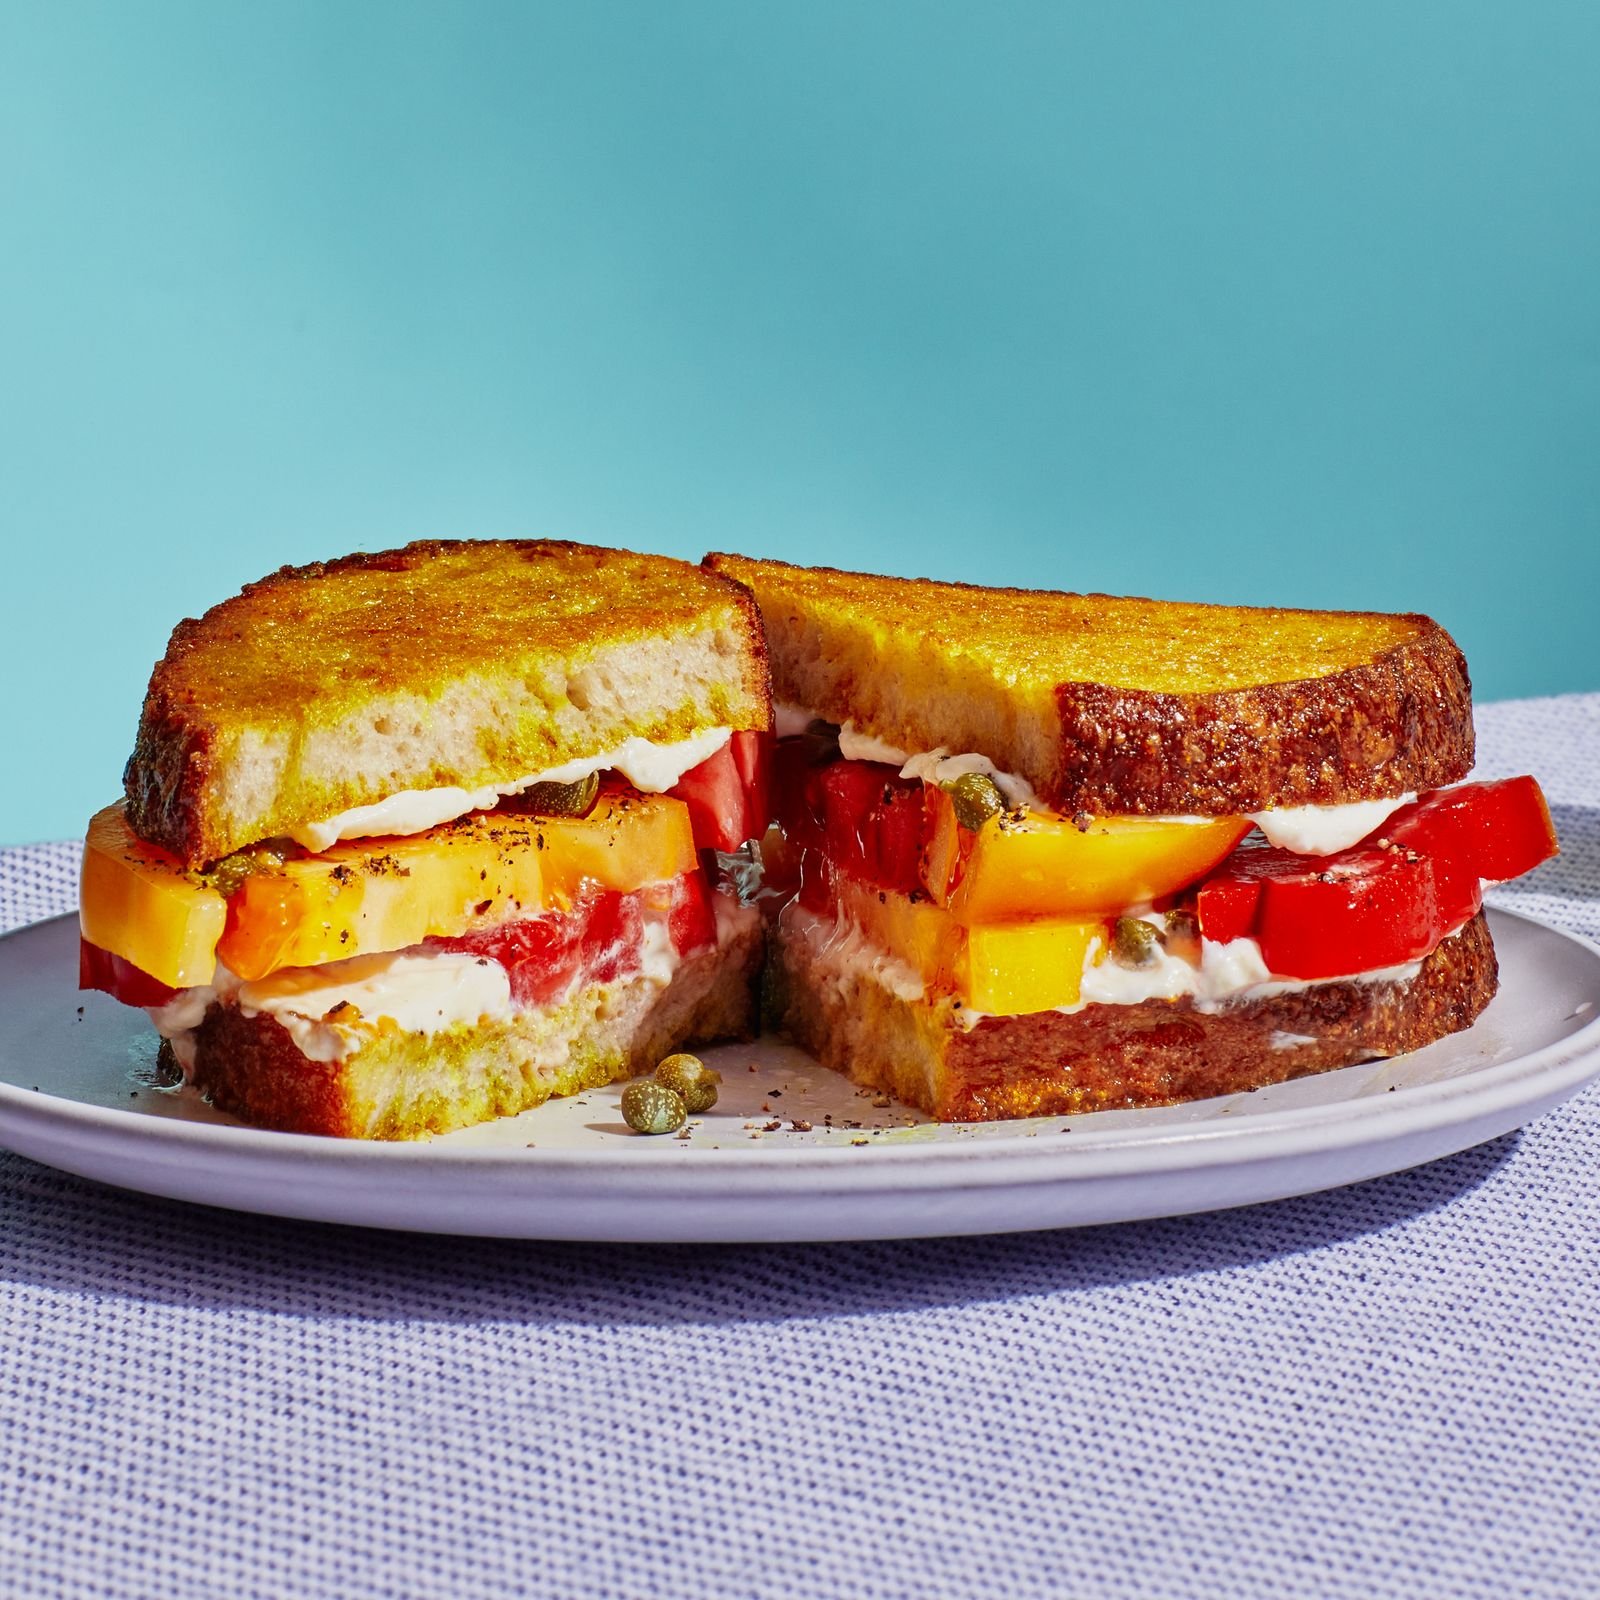
A thick slab of heirlooms makes for a superior tomato sandwich.
Photo by Isa Zapata
Are heirloom tomatoes genetically modified?
One reason why heirloom tomato varieties vary so much is that they’re not genetically modified. Their generations-old seeds haven’t been altered by human hands eager to sell more produce to far-flung shoppers year-round. Open-pollination preserves the plants’ distinctive family characteristics, so heirloom tomatoes taste like, well, tomatoes.
This 15-minute meal is our take on the viral “smash taco” trend. Similar to Turkish lahmacun in architecture, miniaturized and on a tortilla, the concept is simple: Spread a thin layer of ground meat on flatbread, then cook.
This version uses seasoned pork and flour tortillas and is dressed like al pastor tacos with pineapple, onion, and lime. (If you’re not a pork person, swap in ground beef, turkey, or chicken.) Instead of searing meat-side down in a skillet, then flipping to crisp the tortilla (which looks cool on camera but takes a while and runs the risk of the meat sliding off when turned), here you’ll make eight at once in the broiler on a wire-rack–lined baking sheet. Make sure to press the filling all the way to the edges of the tortillas; as the meat broils, it may shrink a bit, but will be no less tasty. This recipe makes eight small tacos, which comfortably serves two to four depending on how hungry everyone is. On the plus side, since they take barely 5 minutes to cook, it’s a snap to make another batch.
The Travel Must-Haves BA Editors Swear by for Stress-Free Trips
Whether I’m traveling for business or for pleasure, my itinerary is basically a string of restaurant reservations. And after a couple multi-course tasting menus, I need to move by body. Balance, right? But when I’m traveling with just a carry-on (see above), luggage space is precious, so I choose workout apparel that does double-duty. Sleek sneakers look cute when walking around town but also work in the gym, and my favorite Left On Friday bike shorts fold up super tiny in my suitcase. —AS
A wireless headphone adaptor for the plane
The AirFly Pro 2 seamlessly connects wireless headphones (or earbuds) to the in-flight entertainment system without glitching or cutting out. Plus it’s got a decently long battery life and is small enough to pack right inside my headphone case, so I never forget it. No more fighting with tangled cords when I lower the tray table to eat my in-flight meal or attempt to extricate myself from the window seat to pace the aisles in my compression socks. —Kelsey Youngman, senior cooking editor
The only good neck pillow
The Trtl Neck Pillow genuinely changed the way I fly. I can actually sleep on planes now. It holds my head securely in place (no more jolting awake mid-bob) and offers real support without feeling bulky. The soft fabric adds a bit of warmth on colder flights, and it packs down flat, making it easy to slip into a carry-on. —Ali Inglese, senior director of video
Place one 10–12-lb. whole beef brisket, fat trimmed to ¼” thick, on a rimmed baking sheet. Mix ⅓ cup Diamond Crystal or 3 Tbsp. plus 1¾ tsp. Morton kosher salt and ⅓ cup freshly ground pepper in a small bowl to combine and sprinkle all over meat (it should look like sand stuck to wet skin but without being cakey). Let sit at room temperature 1 hour.
Step 2
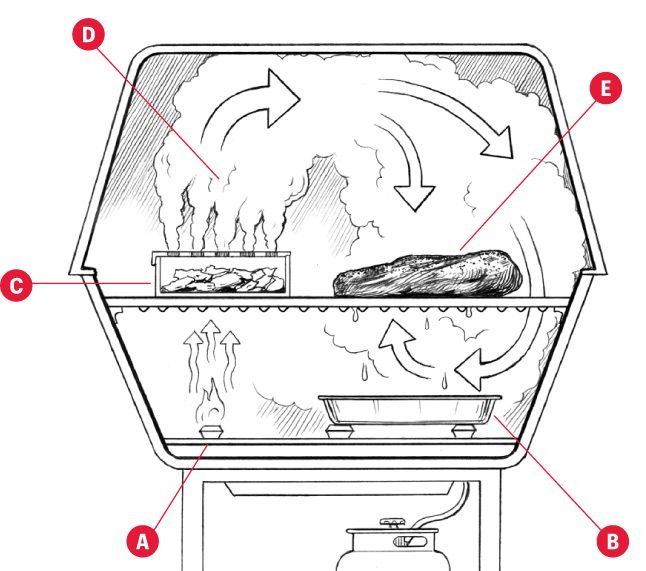
If using a gas grill: While meat is sitting, place 6 cups wood chips in a large bowl and pour in water to cover. Let soak at least 30 minutes and up to 12 hours before using. (Leave in water throughout the cooking process.) Keep remaining 2 cups wood chips dry. Light 1 burner to medium (A; if using a 3-burner grill, light burner on either end). Make sure drip tray (B) is empty, as a lot of fat will render. Place smoker box (C) over the lit burner, add ½ cup soaked wood chips to box, and close grill. Adjust heat as needed to keep temperature at 225–250°. We recommend using a stand-alone thermometer, even if your grill has one, to ensure an accurate reading. Stick it through the gap between lid and base of grill (or set it on the grill’s upper shelf (D), though this is not ideal, as it requires opening the lid more often). The wood chips should begin to smolder and release a steady stream of smoke. How long this takes depends on how wet your chips are and the heat of your grill. To get more smoke without increasing grill heat, add a few dry chips to the soaked ones.
Illustration by Joe McKendry
If using a charcoal grill or smoker: While meat is sitting, fill a chimney starter with charcoal; light and let burn until coals are covered with a thin layer of ash. Pour contents of chimney into one side of grill or smoker. Place 3 chunks of wood next to (not on top of) coals. (You want the wood to catch slowly and smolder. Placing them on top of the coals will cause them to burn too quickly.) Place grate on grill or smoker and cover, positioning vent on lid as far from heat source as possible. (This will help draw the smoke up and over meat as it rises). Stick thermometer through top vent. Heat until thermometer registers 225–250°, adjusting vents on bottom and top of grill or smoker as needed to maintain temperature.
Step 3
If using a gas grill: Place brisket, fatty side up, on grate over indirect heat (E), arranging as far away from lit burner as possible. Cover grill and smoke brisket, adjusting heat as needed to keep temperature between 225–250°, checking wood chips every 45 minutes or so and adding more soaked chips by ½-cupfuls as needed to keep smoke level constant, and rotating meat every 3 hours and turning as needed if top or bottom is coloring faster than the other, until very tender but not falling apart and an instant-read thermometer inserted into thickest part of meat registers 195°–205°, 10–12 hours total.* (Resist the urge to open grill often, as this will cause the temperature to fluctuate.)
If using a charcoal grill or smoker: Place brisket, fatty side up, on grate over indirect heat, arranging as far away from lit burner as possible. Cover grill or smoker and smoke brisket, adjusting vents as needed to control temperature, checking coals and hardwood about every 45 minutes, and rotating meat every 3 hours and turning as needed if top or bottom is coloring faster than the other, until very tender but not falling apart and an instant-read thermometer inserted into thickest part of meat registers 195°–205°, 10–12 hours total.* (Open lid as little as possible; check and replenish coals and hardwood at the same time.) For the coals, once you have checked them and decided to add more (they’ve burned down enough that you’ll need more to keep your fire going and maintain your grill temperature), fill a chimney halfway with coals, then add coals to grill once they’re covered with a thin layer of ash. (If you have a hinged grill grate, you can remove 1 lit coal from grill with a pair of long tongs and place at bottom of chimney to quickly light more coals.) If you control the heat well, you shouldn’t need more than 4–6 chimneyfuls of coals to cook brisket (2–4 chimneyfuls if finishing brisket in the oven). When checking hardwood, move it around to a hotter spot if needed, or replenish extinguished chunks to keep level of smoking constant. Make sure to reposition top vent on lid over meat and away from heat source when replacing.
*Note: If you don’t want to spend your entire day tending the grill, here’s a fail-safe Aaron Franklin–endorsed alternative method that will deliver similarly glorious results: Smoke brisket on grill or smoker as instructed until an instant-read thermometer inserted into thickest part of meat registers 150–170°, about 5–6 hours. Wrap brisket in foil, place on a rimmed baking sheet, and bake in a 250° oven until an instant-read thermometer inserted into thickest part of meat registers 195–205°, 4–6 hours. What’s important is getting that smoky flavor into the meat, and 5–6 hours on the grill should do it. After that point, you’re simply getting the meat cooked through.
Step 4
Transfer brisket to a carving board and let rest at least 30 minutes. Slice brisket against the grain ¼” thick. Transfer to a platter and serve with coleslaw, potato salad, and pinto beans alongside if desired.
Do ahead: Brisket is best shortly off the grill, but you can still get good results smoking it up to 3 days ahead. Let cool 1 hour, then wrap in foil and chill. Reheat, still wrapped, in a 325° oven until warmed through.
Photo by Christopher Testani
Editor’s note:This smoked brisket recipe was first printed in our July 2013 issue; it has been updated for style. Head this way for our favorite BBQ side dishes →
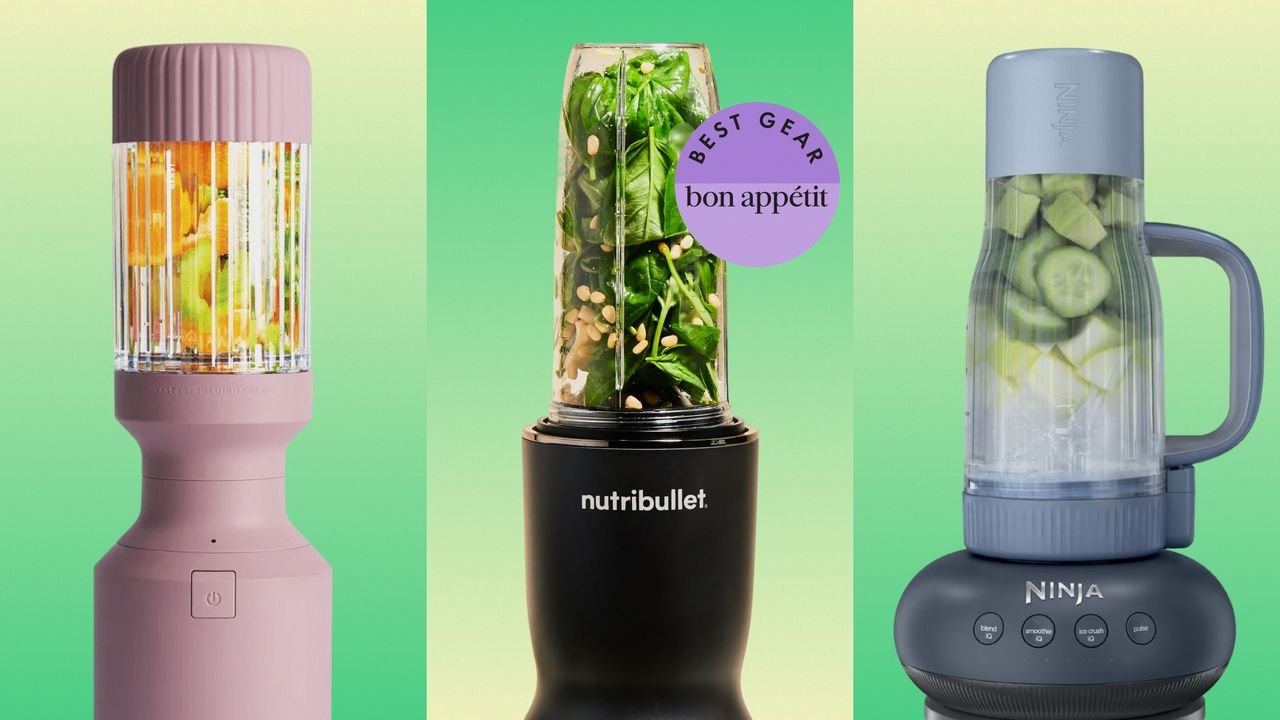
The Best Personal Blenders for Solo Smoothies and Small Batch Sauces
What we love: The biggest problem with most personal blenders is that they lack the motor power that makes something like a Vitamix so effective. Not so with the Nutribullet Ultra, which has an impressive 1,200-watt motor that cuts through everything we threw at it with shocking ease for a blender of this size. For reference, our favorite Vitamix, the 5200, has a not-actually-that-much-more-powerful 1,380-watt motor, and a standard Nutribullet model has a wattage of 600.
At 1,200-watts, the Ultra is tied for the most powerful personal blender we’ve ever used, and the benefits of that superior wattage shone through in our testing. The Ultra was able to turn a pile of fibrous kale (with stems!), frozen fruit, and almond milk into a creamy smoothie with ease, and it produced beautifully emulsified, supremely smooth pesto in 30 seconds flat—something no other personal blender we tested could do.
That top-notch blending performance is also partially due to the design of the titanium-coated stainless-steel blade, which has six prongs, as opposed to the four I’ve seen in most comparable models.
Even setting aside the stellar performance and powerful motor, there’s a lot to love about this mini blender design-wise. It’s equipped with thoughtful features that make it more pleasant to use than other models: very strong suction cup feet that do an excellent job at keeping the unit stable on the counter while the machine is running, a thick-rimmed lid that doesn’t leak, and sleek, intuitive-to-operate touchscreen buttons. Its two modes allow you to run a 30-second blend cycle, or press and hold to blend or pulse.
The Ultra comes with two extra BPA-free blending jars (including a handled one) and two to-go lids. I’ve been using it to take smoothies on my morning commute.
What we’d leave: Though this is an impressive little machine, a personal blender will never afford you the blending power of a premium full-size model like a Vitamix, so it’s important to set reasonable expectations. If you’re looking to crush ice cubes in large quantities or make nut butters, this is not be the blender for you. Other than that, at $165 at the time of writing, this is a great value for the amount of horsepower you’re getting—especially when compared with a Vitamix, which will run you anywhere from $380–$750.
In the long run: “Having this blender at home actually turned me into a smoothie person. I’ve begun using it to make them for myself and my kids for breakfast a couple of days a week. The Nutribullet’s performance is as good now as it was when I first got it over a year ago, zipping up well-blended mixtures of kale, frozen berries, and coconut water.
The real benefit of the Ultra, though, has turned out to be the mini food processor that comes as an optional add-on. If you are considering getting this blender and you do any cooking at all, do yourself a favor and get the processor attachment. I use it to mince garlic and ginger or chop onions every week, often on multiple nights. They’re tasks I find particularly tedious, and, especially in the case of just a couple cloves of garlic, impractical in my regular food processor (who wants to take that thing down and clean it up for two cloves of garlic?). In the mini-processor, the work is done in 10 seconds with the mess quite contained.” —Noah Kaufman, senior commerce editor
Good to know: For an additional $80, you can upgrade to the Nutribullet Ultra Plus+ Compact Kitchen System, which includes the motor base, two blending cups with to-go lids, as well as a coffee/spice grinder (keep it for spices, use a burr grinder for coffee) and mini food processor attachments. There are also a number of other models in the Nutribullet lineup, including the Pro+, Pro 1000 (reviewed below), Pro, and classic Nutribullet.


 Tech3 days ago
 Entertainment2 days ago

 Food3 days ago
 Business5 days ago
 Video8 minutes ago